说明
Java存在多种打包方式,最终的效果都是保证能够打包成为一个fatjar。但是如果我们仔细深入研究分析发现,目前存在的集中打包方式也存在差别。
本文将从打包之后产生的项目的文件结构,对依赖的出来来进行说明分析。
文件结构
spring-boot-gradle-plugin
Main-Class
以一个最简单的HelloWorld项目来说明,顺便来探讨几种情况.1
2
3
4
5
6
7
8
9
10
11
12
13
14
15
16
17
18
19
20
21
22
23
24
25
26
27
28
29
30
31
32
33
34
35
36
37
38
39buildscript {
ext {
springBootPlugin = 'org.springframework.boot:spring-boot-gradle-plugin'
springBootVersion = '2.0.2.RELEASE'
}
repositories {
mavenCentral()
}
dependencies {
classpath("${springBootPlugin}:${springBootVersion}")
}
}
apply plugin: 'org.springframework.boot'
apply plugin: 'io.spring.dependency-management'
apply plugin: 'java'
group 'org.example'
version '1.0-SNAPSHOT'
repositories {
maven{ url 'http://maven.aliyun.com/nexus/content/groups/public/'}
mavenCentral()
}
dependencies {
testCompile group: 'junit', name: 'junit', version: '4.12'
}
介绍
bootJar {
manifest {
attributes (
'Built-Date':new Date(),
'Created-By':'spoock',
'Main-Class': 'com.spoock.Test',
)
}
}
看一下打包出来的项目结构
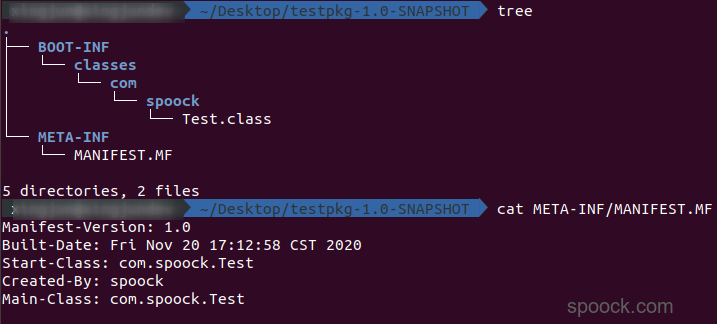
实际运行会出现这样的问题:Error: Could not find or load main class com.spoock.Test。出现这样的原因,继续看下面的打包的方式。
Start-Class
如果修改其中的Main-Class为Start-Classs再来看看情况1
2
3
4
5
6
7
8
9
10
11
12
13
14
15
16
17
18
19
20
21
22
23
24
25
26
27
28
29
30
31
32
33
34
35
36
37
38
39buildscript {
ext {
springBootPlugin = 'org.springframework.boot:spring-boot-gradle-plugin'
springBootVersion = '2.0.2.RELEASE'
}
repositories {
mavenCentral()
}
dependencies {
classpath("${springBootPlugin}:${springBootVersion}")
}
}
apply plugin: 'org.springframework.boot'
apply plugin: 'io.spring.dependency-management'
apply plugin: 'java'
group 'org.example'
version '1.0-SNAPSHOT'
repositories {
maven{ url 'http://maven.aliyun.com/nexus/content/groups/public/'}
mavenCentral()
}
dependencies {
testCompile group: 'junit', name: 'junit', version: '4.12'
}
bootJar {
manifest {
attributes (
'Built-Date':new Date(),
'Created-By':'spoock',
'Start-Class': 'com.spoock.Test',
)
}
}
实际测试,是完全可以正常运行的。最终打包出来的项目结构是:
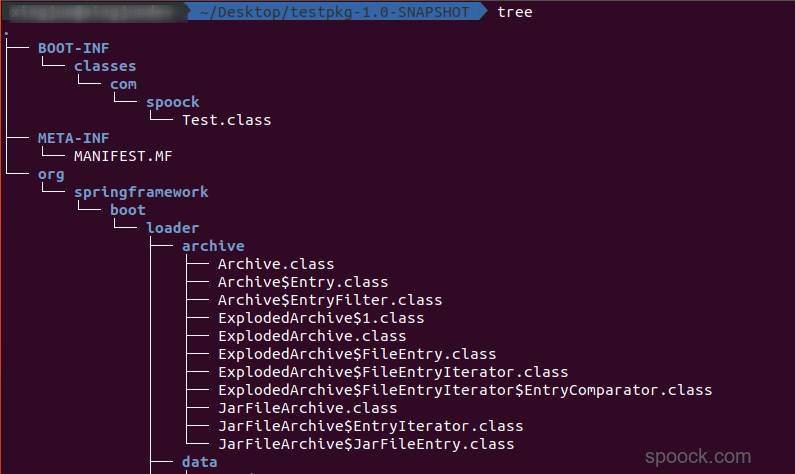
可以发现会将springboot相关的包打进来.此时的mainfest的内容是:

Main-class变为了org.springframework.boot.loader.JarLauncher. 至于为什么会出现这样的问题,参见manifest-mf-difference-between-main-class-and-start-class.
简而言之,就是使用springboot打包时,Main-Class需要是Jar-Launchaer,通过Jar-Launchaer来加载Start-Class,而Start-Class才是我们需要实际运行的类.
所以,我们在使用springboot插件打包我的项目时,Main-Class是不能自己手动指定,否则项目无法运行。
mainClassName
除了通过manifest指定之外,还可以通过mainClassName的方式制定启动类.如下所示:1
2
3
4
5
6
7
8
9
10
11
12
13
14
15
16
17
18
19
20
21
22
23
24
25
26
27
28
29
30
31
32
33
34
35
36
37
38
39buildscript {
ext {
springBootPlugin = 'org.springframework.boot:spring-boot-gradle-plugin'
springBootVersion = '2.0.2.RELEASE'
}
repositories {
mavenCentral()
}
dependencies {
classpath("${springBootPlugin}:${springBootVersion}")
}
}
apply plugin: 'org.springframework.boot'
apply plugin: 'io.spring.dependency-management'
apply plugin: 'java'
group 'org.example'
version '1.0-SNAPSHOT'
repositories {
maven{ url 'http://maven.aliyun.com/nexus/content/groups/public/'}
mavenCentral()
}
dependencies {
testCompile group: 'junit', name: 'junit', version: '4.12'
}
bootJar {
mainClassName = 'com.spoock.Test'
manifest {
attributes (
'Built-Date':new Date(),
'Created-By':'spoock',
)
}
}
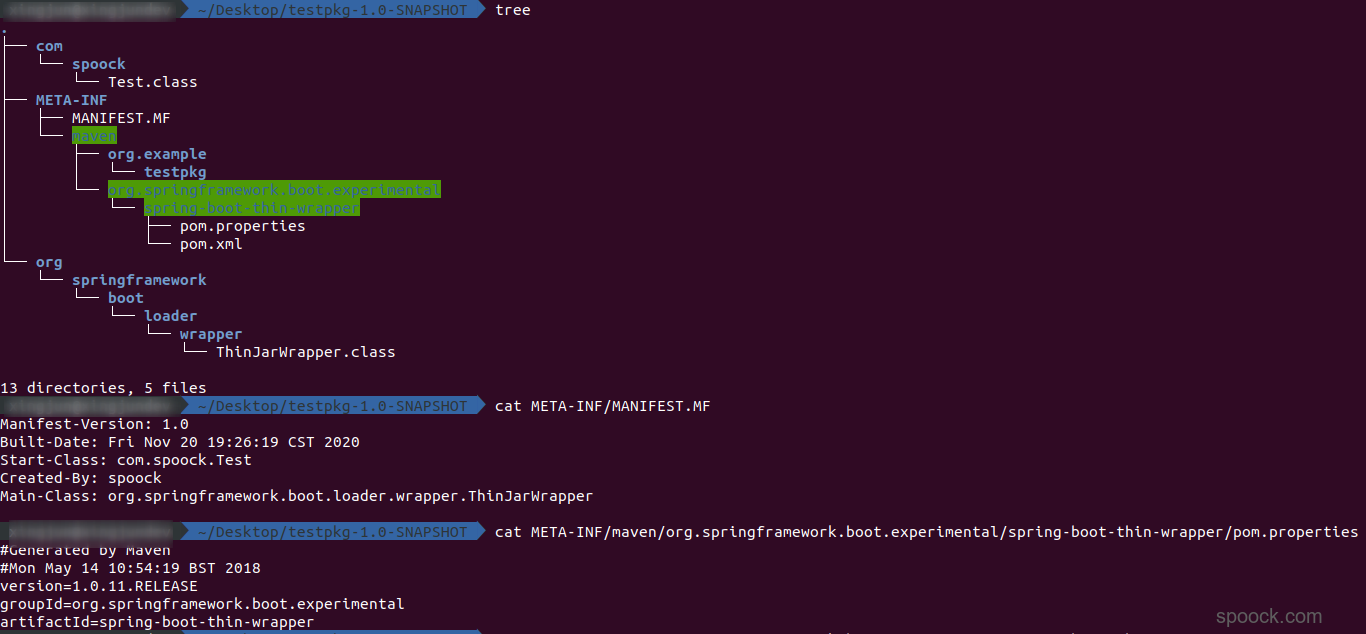
打包之后得到的项目结构如下:

META-INF/MANIFEST.MF结构如下:

所以通过mainClassName和指定start-class的效果是一样的
spring-boot-thin-gradle-plugin
spring-boot-thin-launcher 特点如下:
- 插件可以生成pom.xml或thin.properties文件保存项目所依赖的jar包
- 打包时只将自己项目打包,依赖项目不打包
- 启动时单独使用的转载器从pom.xml或者thin.properties中读取依赖,然后从Maven仓库下载依赖到本地
- 运行自己项目的Main函数
1 | buildscript { |
打包时记得使用thinjar的方式才会打包生成thinjar包.
可以见到项目结构和spring-boot基本保持一直,但是并没有包含spring-boot相关的jar包,而是在运行时下载.
shadowJar
shadowJar的gradle写法如下:1
2
3
4
5
6
7
8
9
10
11
12
13
14
15
16
17
18
19
20
21
22
23
24
25
26
27
28apply plugin: 'java'
apply plugin: 'com.github.johnrengelman.shadow'
buildscript {
repositories {
jcenter()
}
dependencies {
classpath "com.github.jengelman.gradle.plugins:shadow:5.2.0"
}
}
group 'org.example'
version '1.0-SNAPSHOT'
repositories {
maven{ url 'http://maven.aliyun.com/nexus/content/groups/public/'}
mavenCentral()
}
dependencies {
}
shadowJar {
manifest {
attributes ('Main-Class': 'com.spoock.Test')
}
}
最终生成的项目结构是:
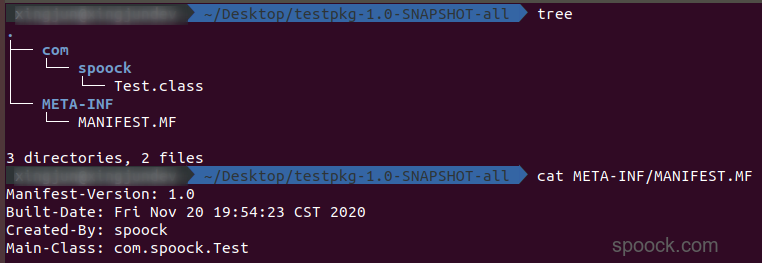
想较而言,使用shadowJar打包生成的jar是最干净的
maven-jar-plugin
上面都是采用gradle的方式打包项目。如果是maven项目,可以采用maven-jar-plugin打包项目。1
2
3
4
5
6
7
8
9
10
11
12
13
14
15
16
17
18
19
20
21
22
23
24
25
26
27
28
29
30
31
32
33
34
35
36
37
38
39
40xml version="1.0" encoding="UTF-8"
<project xmlns="http://maven.apache.org/POM/4.0.0"
xmlns:xsi="http://www.w3.org/2001/XMLSchema-instance"
xsi:schemaLocation="http://maven.apache.org/POM/4.0.0 http://maven.apache.org/xsd/maven-4.0.0.xsd">
<modelVersion>4.0.0</modelVersion>
<groupId>org.example</groupId>
<artifactId>testpkg2</artifactId>
<version>1.0-SNAPSHOT</version>
<build>
<finalName>${project.artifactId}</finalName>
<plugins>
<plugin>
<groupId>org.apache.maven.plugins</groupId>
<artifactId>maven-jar-plugin</artifactId>
<version>2.6</version>
<executions>
<execution>
<phase>package</phase>
</execution>
</executions>
<configuration>
<archive>
<manifestEntries>
<Built-Date>new Date()</Built-Date>
<Created-By>Spoock</Created-By>
<addClasspath>true</addClasspath>
<classpathPrefix>lib/</classpathPrefix>
<Main-Class>com.spoock.Test</Main-Class>
</manifestEntries>
</archive>
</configuration>
</plugin>
</plugins>
</build>
</project>
观察打包之后的项目结构:
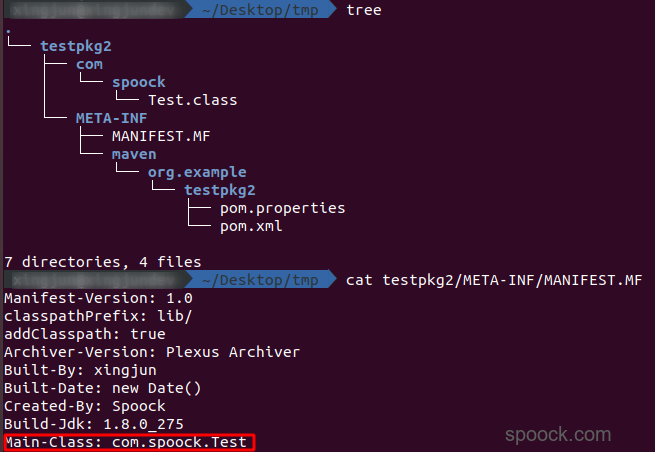
使用maven-jar-plugin打包出来的包也没有增加多余的东西,也是相当的干净
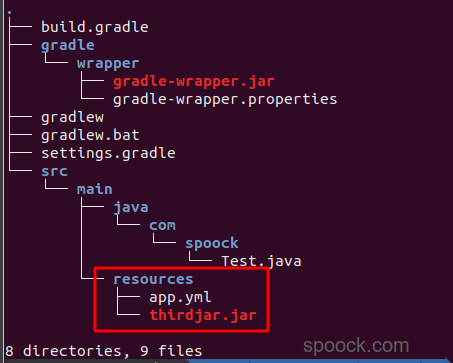
依赖
为了测试效果,我们创建了resource目录,并在resource中放至了jar包.整个项目结构如下所示:
spring-boot-gradle-plugin
使用spring-boot-gradle-plugin的配置文件如下:1
2
3
4
5
6
7
8
9
10
11
12
13
14
15
16
17
18
19
20
21
22
23
24
25
26
27
28
29
30
31
32
33
34
35
36
37
38
39
40buildscript {
ext {
springBootPlugin = 'org.springframework.boot:spring-boot-gradle-plugin'
springBootVersion = '2.0.2.RELEASE'
}
repositories {
mavenCentral()
}
dependencies {
classpath("${springBootPlugin}:${springBootVersion}")
}
}
apply plugin: 'org.springframework.boot'
apply plugin: 'io.spring.dependency-management'
apply plugin: 'java'
group 'org.example'
version '1.0-SNAPSHOT'
repositories {
maven{ url 'http://maven.aliyun.com/nexus/content/groups/public/'}
mavenCentral()
}
dependencies {
testCompile group: 'junit', name: 'junit', version: '4.12'
compile group: 'com.alibaba', name: 'fastjson', version: '1.2.75'
}
bootJar {
manifest {
attributes (
'Built-Date':new Date(),
'Created-By':'spoock',
'Start-Class': 'com.spoock.Test',
)
}
}
使用spring-boot-gradle-plugin打包之后的项目结构是:
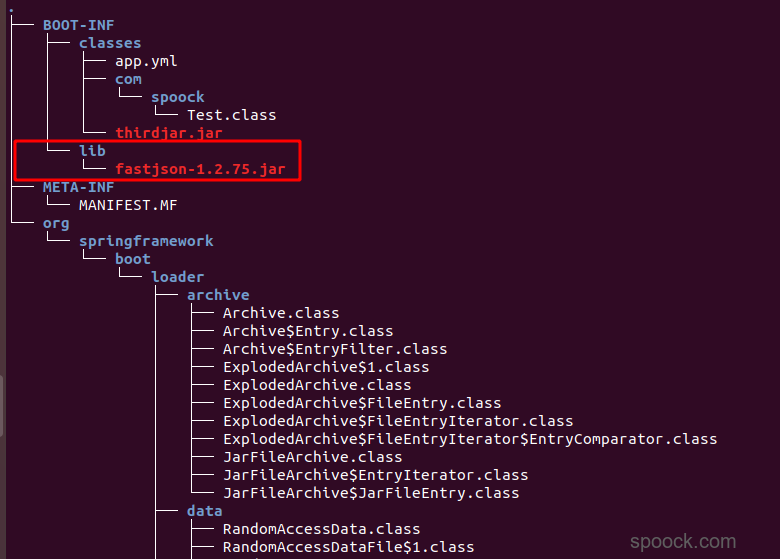
所有的依赖,会全部放置在lib目录下,所有的resource下的文件全部放至在classes目录下
spring-boot-thin-gradle-plugin
使用spring-boot-thin-gradle-plugin打包的gradle配置文件如下:1
2
3
4
5
6
7
8
9
10
11
12
13
14
15
16
17
18
19
20
21
22
23
24
25
26
27
28
29
30
31
32
33
34
35
36
37
38
39
40
41
42
43
44
45
46buildscript {
ext {
springBootPlugin = 'org.springframework.boot:spring-boot-gradle-plugin'
springBootVersion = '2.0.2.RELEASE'
thinPlugin = 'org.springframework.boot.experimental:spring-boot-thin-gradle-plugin'
thinVersion = '1.0.11.RELEASE'
}
repositories {
mavenCentral()
}
dependencies {
classpath("${springBootPlugin}:${springBootVersion}")
classpath("${thinPlugin}:${thinVersion}")
}
}
apply plugin: 'java'
apply plugin: 'org.springframework.boot'
apply plugin: 'io.spring.dependency-management'
apply plugin: 'org.springframework.boot.experimental.thin-launcher'
group 'org.example'
version '1.0-SNAPSHOT'
repositories {
maven{ url 'http://maven.aliyun.com/nexus/content/groups/public/'}
mavenCentral()
}
dependencies {
testCompile group: 'junit', name: 'junit', version: '4.12'
compile group: 'com.alibaba', name: 'fastjson', version: '1.2.75'
}
bootJar {
mainClassName = 'com.spoock.Test'
manifest {
attributes (
'Built-Date':new Date(),
'Created-By':'spoock',
)
}
}
bootJar.dependsOn = [thinProperties]
使用spring-boot-thin-gradle-plugin打包会额外的生成一个thin.propertihes,其中包含了项目需要的依赖。当我们项目运行之后,程序会在第一次启动时下载依赖,运行完毕之后项目结构变为:

使用spring-boot-thin-gradle-plugin打包得到的fatjar不会包含有任何的依赖。
shadowJar
shadowJar的gradle项目结构如下:1
2
3
4
5
6
7
8
9
10
11
12
13
14
15
16
17
18
19
20
21
22
23
24
25
26
27
28
29
30apply plugin: 'java'
apply plugin: 'com.github.johnrengelman.shadow'
buildscript {
repositories {
jcenter()
}
dependencies {
classpath "com.github.jengelman.gradle.plugins:shadow:5.2.0"
}
}
group 'org.example'
version '1.0-SNAPSHOT'
repositories {
maven{ url 'http://maven.aliyun.com/nexus/content/groups/public/'}
mavenCentral()
}
dependencies {
testCompile group: 'junit', name: 'junit', version: '4.12'
compile group: 'com.alibaba', name: 'fastjson', version: '1.2.75'
}
shadowJar {
manifest {
attributes ('Main-Class': 'com.spoock.Test')
}
}
最终打包得到的fatjar文件结构如下所示:
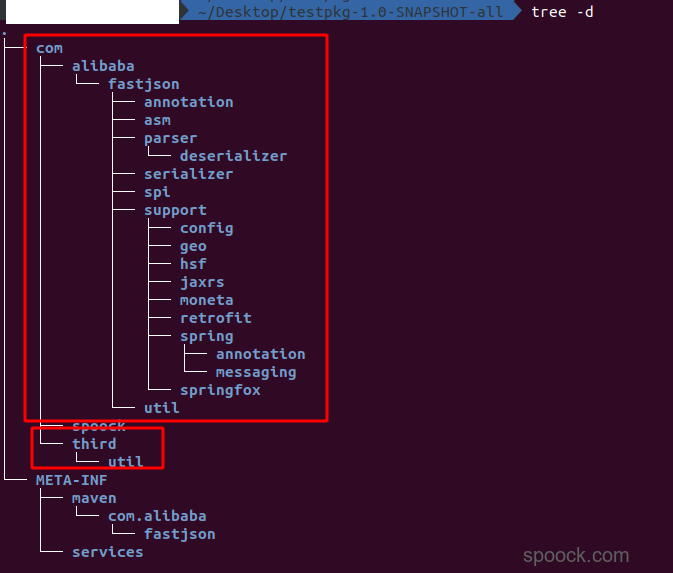
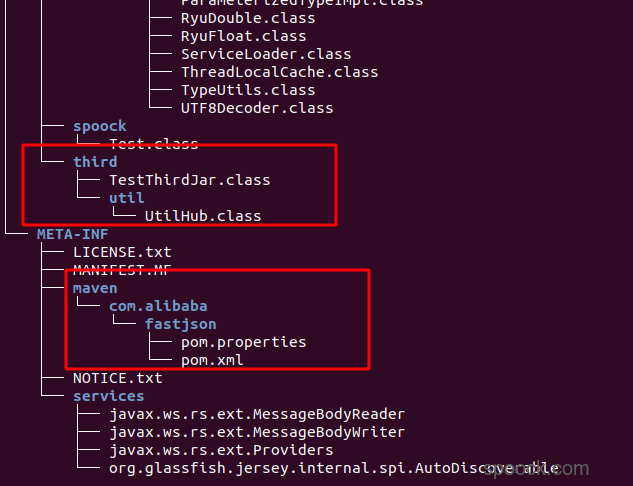
可以看到,对于shadowJar,无论是在resource目录下,还是项目依赖的jar包全部都会被解压出来.
maven-jar-plugin
默认情况下,maven-jar-plugin是不会打包依赖的,所以maven-jar-plugin通常需要配合maven-dependency-plugins插件一起来使用。参考常用Maven打包方式.
使用maven-jar-plugin的方式打包时,所有的依赖无法直接打包进入到最终的jar包中,需要将所有的依赖全部打包到其他位置中,然后通过指定classpath的方式将其导入.
1 | xml version="1.0" encoding="UTF-8" |
最终的项目结构如下所示:
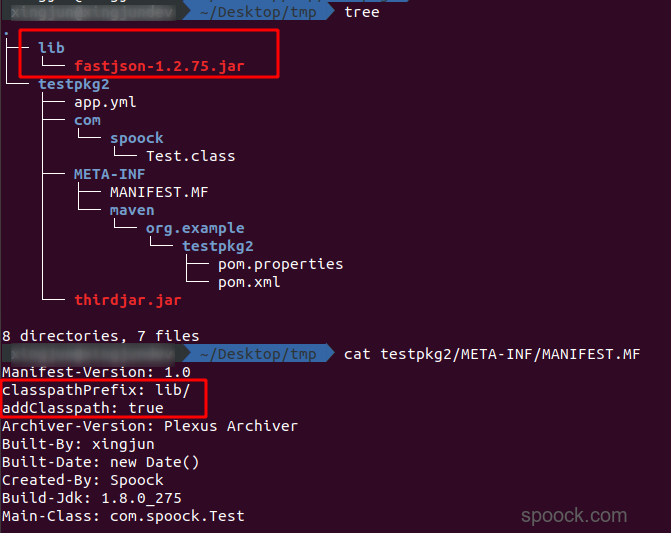
通过classpathPrefix和addClasspath指定依赖的位置
总结
以上就是对各种不同的打包方式一个简要的分析和对比。